In this lab we were curdling milk so we could run tests on what macro-molecules could be found in cheese. We also were able to design our own lab were we got to experiment with how fast milk curdled. In the end we learned how cheese is made and what macro-molecules are found in cheese.
Content
Maro-molecule:
They are large molecules that store energy or provide energy. There are types of macro molecules are lipids, carbohydrates, proteins, and nucleic acids.
Carbohydrates:
They make and store energy for the cell for a short period of time. They consist of monosaccharides.
Lipids:
They store energy for a long period of time and they make up the cell walls. They are most commonly found as fatty acids.
Proteins:
They carry out any function the cell needs to accomplish, i.e. fighting against an infection, transmitting information, and transporting small molecules. They are made of 20 different amino acids.
Nucleic Acids:
They hold and carry all the cell's information and purpose in the DNA. They are made of nucleotides.
Purpose
The purpose of this lab was to learn how to make cheese and to find which curdling agent worked the fastest and to learn what macro molecules are in the cheese we made.
Hypothesis
My hypothesis for part one is that the cheese will be soft. If the ratio of FPC is higher than the milk will curdle faster. If the third lab is done right then the cheese should contain fats, proteins, and sugars.
Procedure
Part 1:
1. Label four 6 ml tubes with the type of curdling agent and group number.
2. Use a large pipet to transfer 3 ml of milk to each of the 6 ml tubes.
3. Use a small pipet and transfer the entire contents of the tubes of fermentation produced chymosin, natural bovine
chymosin, and buttermilk to the labeled tube containing the milk. For water, fill the small transfer pipet to the bottom of the bulb and add to the labeled tube containing the milk. Use a different pipet for each transfer to avoid cross contamination.
4. Cap the tubes and invert the tubes three times and then 37 degrees Celsius water bath or at body temperature for incubation.
5. Set a timer and check for curdling every 5 minutes by gently inverting the tube and examining for curds
6. Record the time in minutes when the milk begins to curdles or solidify.
7. If the milk has not curdled in 30 minutes, check for curdling every hour.
8. In a table record the time in minutes when the milk begins to curdle or solidify.
9. During the next work period determine the amount of curds produced by each treatment.
10. For each treatment weigh a paper cone and record the empty cone weight.
11. Transfer entire contents of a tube into a labeled filter paper cone over a suitable collection vessel, once all the liquid has drained dry the filter paper with curds overnight.
12. Weigh the dry cone with all the dry curds, subtract the dry cone weight. Record the weight of the curds in mg by multiplying the mass in grams by 1000.
13. Repeat for each treatment.
14. Create a data table that reports the Rate of Curd Production by each curdling agent.
15. Create a bar graph that reports the Rate of Curd Production by each curdling agent.
Part 2:
1. Label four tubes with the amount of curdling agent.
2. Use a dropper to transfer 2 ml of milk to each tube.
3. Use a small pipet to transfer 100, 200, 300, and 400 micro liters of FPC into each test tube of milk.
4. Invert the test tubes three times then incubate it at 37 degrees Celsius.
5. Check for curdling every 30 seconds for 5 minutes by gently inverting the tube. If no curdles have not formed in 5 minutes check every 5 minutes.
6. Record the time when the milk begins to curdle.
7. If milk has not curdled in 30 minutes check every hour.
8. In a data table record the time when the milk curdles.
9. Determine the amount curds produced by each treatment.
10. For each treatment weigh a paper cone and record the empty cone weight.
11. Transfer entire contents of a tube into a labeled filter paper cone over a suitable collection vessel, once all the liquid has drained dry the filter paper with curds overnight.
12. Weigh the dry cone with all the dry curds, subtract the dry cone weight. Record the weight of the curds in mg by multiplying the mass in grams by 1000.
13. Repeat for each treatment.
14. Create a data table that reports the Rate of Curd Production by each FPC amount.
15. Create a bar graph that reports the Rate of Curd Production by each FPC amount.
Part 3:
Monosaccharide Indicator Standard Test
1. Test for glucose: In a test tube, mix 2 ml of a 2% glucose (a monosaccharide) solution with 2 ml of Benedict’s solution. Heat for 2 minutes in a boiling hot water bath (100 ml of water in a 250-mL beaker at 100 degrees Celsius). Record all color changes and the length of time for each color to appear.
2. Test for water (negative control): In a test tube, mix 2 ml of deionized water with 2 ml of Benedict’s solution. Heat for 2 minutes in a boiling hot water bath (100 ml of water in a 250-mL beaker at 100 degrees Celsius)
Starch Indicator Standard Test
1. Test the starch: In a test tube, mix 2 ml of well-mixed starch suspension with 0.25 ml of Lugol’s iodine. Gently swirl to mix. DO NOT HEAT. Record the color change.
2. Test for water (negative control): In a test tube, mix 2 mL of deionized water with 0.25 ml of Lugol’s iodine. Gently swirl to mix. DO NOT HEAT. Record the color change.
Protein Indicator Standard Test
1. Test for protein: Place 2 ml of gelatin (protein) solution in a test tube. Wearing goggles and gloves, add 0.5 ml of 10% Na OH and gently vortex to mix. Add 0.25 ml of 5% copper sulfate (CuSO4) and gently mix. The Na OH and CuSO4 mixture is called Biuret reagent. Mix well. Record color change after 30 seconds.
2. Test for water (negative control): Place 2 ml of deionized water in a test tube. Wearing goggles and gloves, add 0.5 ml of 10% Na OH and gently vortex to mix. Add 0.25 ml of 5% CuSO4 and gently mix well. Record color change after 30 seconds.
Lipid Indicator Standard Test
1. Test for lipid(s): Place a drop of oil (100% fat) on a piece of brown paper bag. Let it “dry” for 10 minutes. Hold up the paper to the light. Record how much light passes through the spot.
2. Test for water: Place a drop of water on a piece of brown paper bag. Let it “dry” for 10 minutes. Hold up the paper to the light. Record how much light passes through the spot.
Testing Cheese for Macro Molecules
1. Take cheese sample (FPC) and crush it into a powder.
2. Measure out 0.5 grams of cheese.
3. Measure out 0.2 ml of water and put it into tube. Repeat for the other samples.
4. Place 0.5 grams of cheese powder into the tube with water
5. Put 2 ml of Benedict into one tube with cheese and water mixture
6. Put the Benedict/ FPC sample in a boiling hot water bath for two minutes. Record color changes.
7. Put 0.25 ml of Lugol's iodine into a tube with cheese and water mixture. Record color changes.
8. Place 0.75 ml of Biuret mixture into a tube with cheese and water. Gently vortex to mix and record color changes after 30 seconds.
9. Place 60 ml of Sudan IV solution into a tube with cheese and water mixture. Gently mix and record color changes.
Data/ Observations
Part One:
I noticed that the FPC had a very potent smell. The curdled milk looked completely solid, but it was very liquidy. The milk was still very white even after the FPC was added. Not much liquid was drained from the curdled milk, most of it was absorbed into the paper.
I noticed that the FPC had a very potent smell. The curdled milk looked completely solid, but it was very liquidy. The milk was still very white even after the FPC was added. Not much liquid was drained from the curdled milk, most of it was absorbed into the paper.
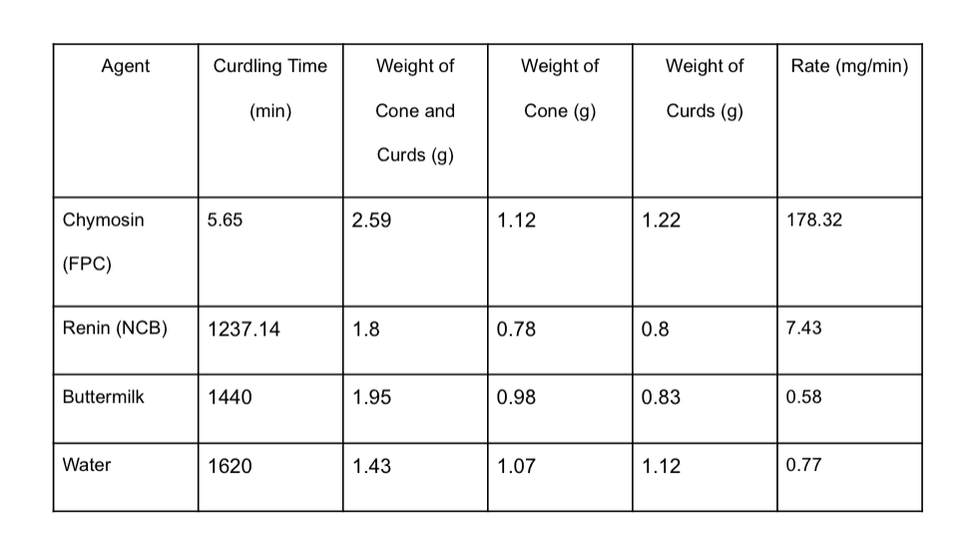
(Figure 1):
These were the class averages. This table shows the time it took to curdle, the original amount of cheese vs. the final weight, and the rate of change.
These were the class averages. This table shows the time it took to curdle, the original amount of cheese vs. the final weight, and the rate of change.
Part Two:
The FPC still had a foul odor. I noticed that it took more time for the milk when there was more FPC. The milk was a little sticky after the FPC was added. Most of the excess liquid was still absorbed into the paper filter.
The FPC still had a foul odor. I noticed that it took more time for the milk when there was more FPC. The milk was a little sticky after the FPC was added. Most of the excess liquid was still absorbed into the paper filter.
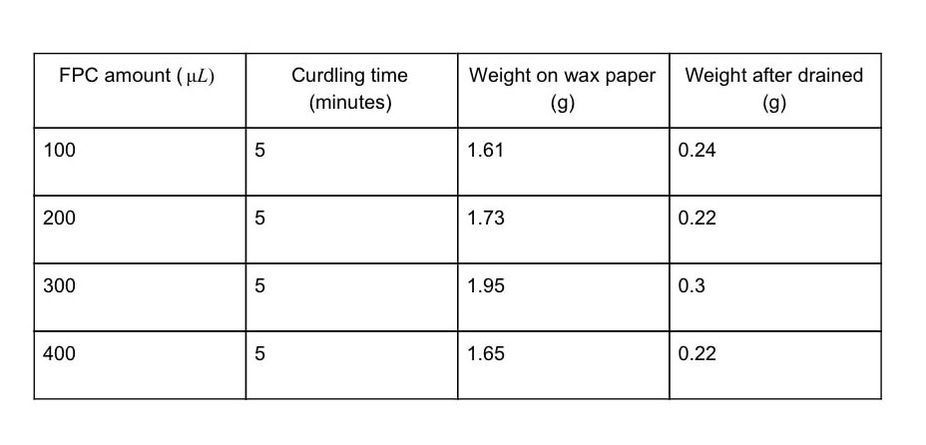
(Figure 2):
This was our data for how much curds and whey we made vs. just the curds.
This was our data for how much curds and whey we made vs. just the curds.
Part Three:
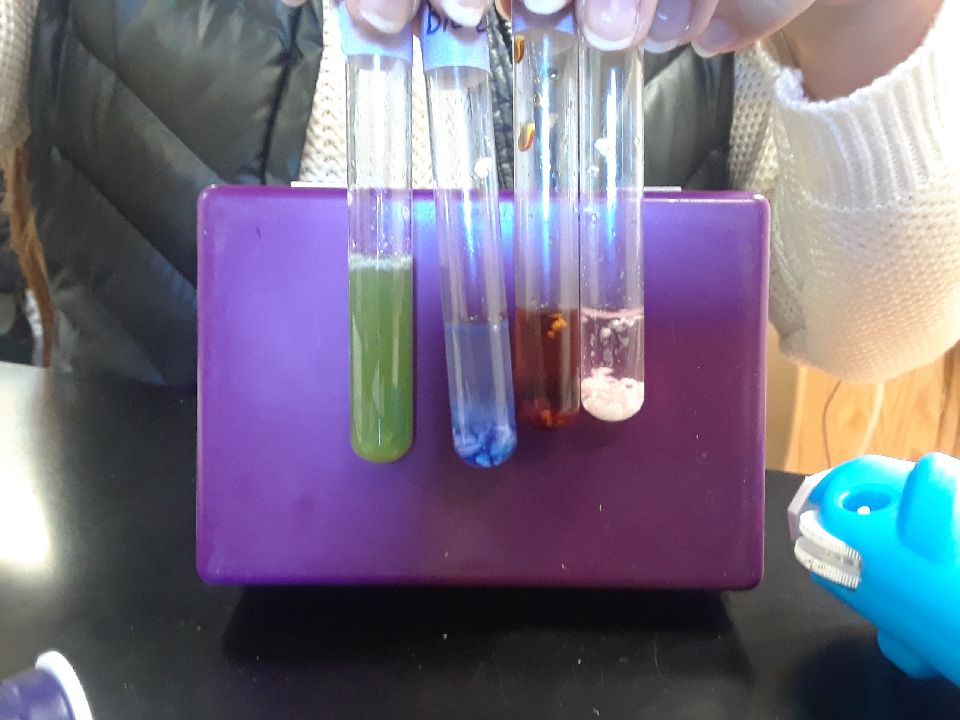
The color reactions happened very quickly. The glucose positive test turned completely orange, the negative test turned a light blue. The starch positive test turned a dark brown and the negative test turned a light brown. The protein positive test was a dark blue almost purple color and the negative test changed to a pale sky blue. The positive fat test resulted in a dark pink ombré, the negative test was a light pink.
The color reactions happened very quickly. The glucose positive test turned completely orange, the negative test turned a light blue. The starch positive test turned a dark brown and the negative test turned a light brown. The protein positive test was a dark blue almost purple color and the negative test changed to a pale sky blue. The positive fat test resulted in a dark pink ombré, the negative test was a light pink.
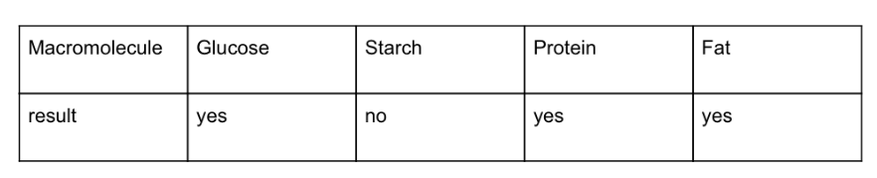
(Figure 3):
This data table shows what macro molecules are in cheese. This table proves my hypothesis to be right.
This data table shows what macro molecules are in cheese. This table proves my hypothesis to be right.

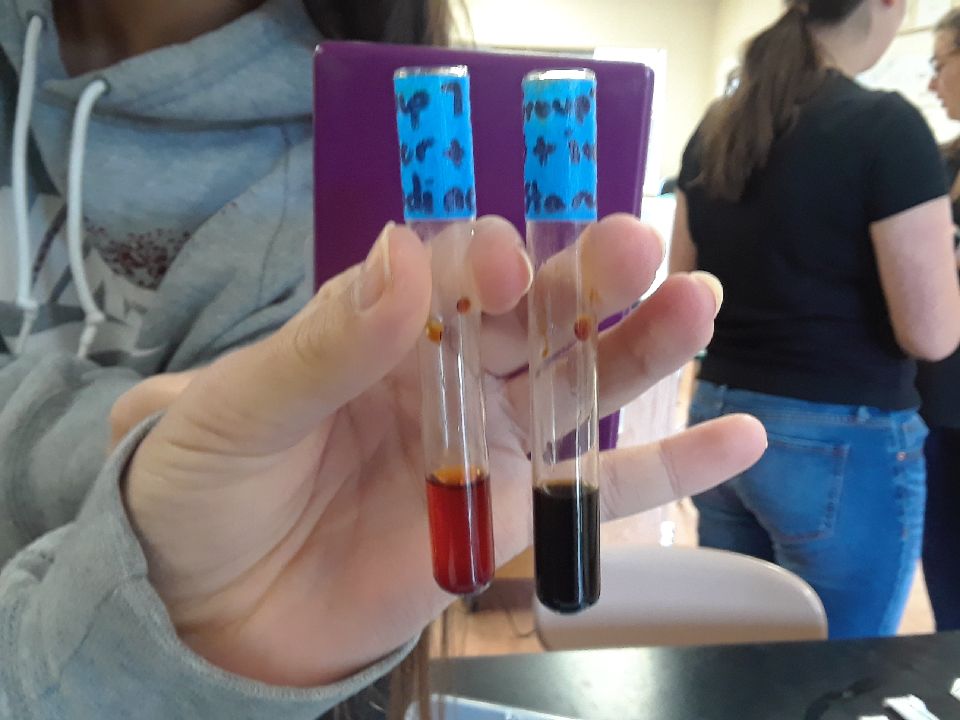
(Figure 4):
Positive test glucose (left) starch (right) |
(Figure 5):
Negative test glucose (left) starch (right) |

(Figure 6):
Protein positive (left) negative (right) |
(Figure 7):
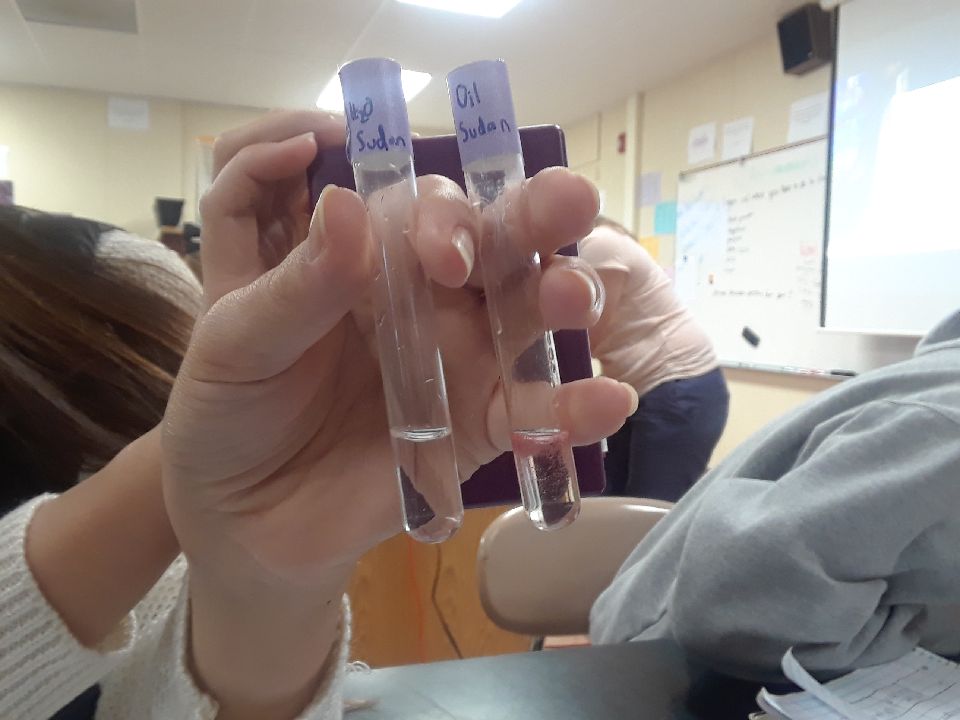
Fat negative (left) positive (right) |
(Figure 8):
This shows all the pieces of cheese inside of each solution so we could see if it was positive or negative. If it was positive then we knew it was found in our cheese. |
Analysis
Part One:
My hypothesis for part one was that the cheese would be soft because it would still be fresh and it would not have time to age. My hypothesis was quickly proven wrong because we had to scrape the cheese off the filter so we could use it for part three. The cheese flaked off and it was had to grind into a powder for part three, if the cheese was soft it would have been easier to work with. A way we could have improved the lab was through an error. We keep our cheese under our arms to incubate, but we all have different body temperatures this changes the outcome of the data. If we stuck the test tubes in an incubator then we would have more accurate time because we would have a universal temperature. Another way we could change the lab was instead of using water agent as a control we should have had just milk because nothing would have been added to it to possibly change the data. By doing this we can also see how long it takes for only milk to curdle which would make it a better control than water. We also should have continued checking the test tubes after the half hour mark instead of waiting to the next work day because that lead to incorrect rates for how fast each solution curdles. This lab makes me want to investigate if different percentages of milk have an effect on the curdling time.
My hypothesis for part one was that the cheese would be soft because it would still be fresh and it would not have time to age. My hypothesis was quickly proven wrong because we had to scrape the cheese off the filter so we could use it for part three. The cheese flaked off and it was had to grind into a powder for part three, if the cheese was soft it would have been easier to work with. A way we could have improved the lab was through an error. We keep our cheese under our arms to incubate, but we all have different body temperatures this changes the outcome of the data. If we stuck the test tubes in an incubator then we would have more accurate time because we would have a universal temperature. Another way we could change the lab was instead of using water agent as a control we should have had just milk because nothing would have been added to it to possibly change the data. By doing this we can also see how long it takes for only milk to curdle which would make it a better control than water. We also should have continued checking the test tubes after the half hour mark instead of waiting to the next work day because that lead to incorrect rates for how fast each solution curdles. This lab makes me want to investigate if different percentages of milk have an effect on the curdling time.
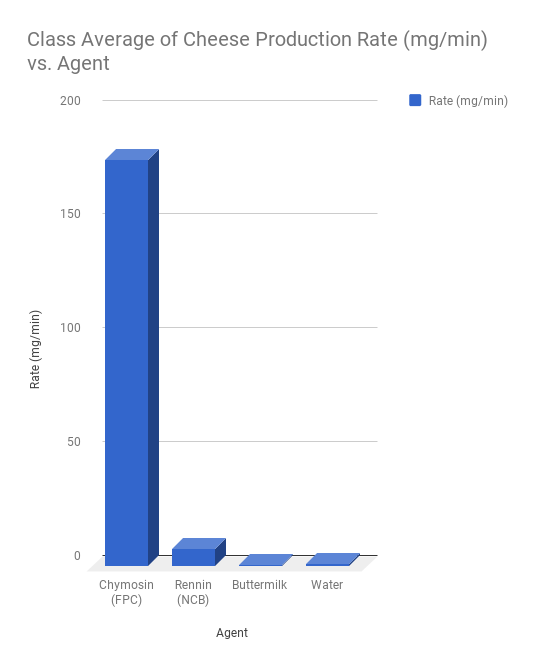
(Figure 9):
This diagram shows the rate of how many milligrams of agent to make milk curdle. The higher the number the quicker it takes for the cheese to curdle. This means that FPC is the best agent to use if you want your milk to curdle quickly.
This diagram shows the rate of how many milligrams of agent to make milk curdle. The higher the number the quicker it takes for the cheese to curdle. This means that FPC is the best agent to use if you want your milk to curdle quickly.
Part Two:
My hypothesis for part two was if there is more FPC, then the milk will curdle faster. I can not prove or disprove my hypothesis because the more FPC there was the higher the concentration meaning the was less milk for it to curdle. The milk still curdled in five minutes, but as the concentration got higher there was more liquid waste. This leads me to believe there is a certain amount of FPC milk can handle to be the most efficient. An error that we had was not keeping the test directly under our arms because some of us had sweatshirts on. One thing that I would change would be also testing smaller amounts of FPC to see how that affected the milk’s curdling time. This lab makes me want to investigate if different percentages of milk have an effect on the FPC.
My hypothesis for part two was if there is more FPC, then the milk will curdle faster. I can not prove or disprove my hypothesis because the more FPC there was the higher the concentration meaning the was less milk for it to curdle. The milk still curdled in five minutes, but as the concentration got higher there was more liquid waste. This leads me to believe there is a certain amount of FPC milk can handle to be the most efficient. An error that we had was not keeping the test directly under our arms because some of us had sweatshirts on. One thing that I would change would be also testing smaller amounts of FPC to see how that affected the milk’s curdling time. This lab makes me want to investigate if different percentages of milk have an effect on the FPC.
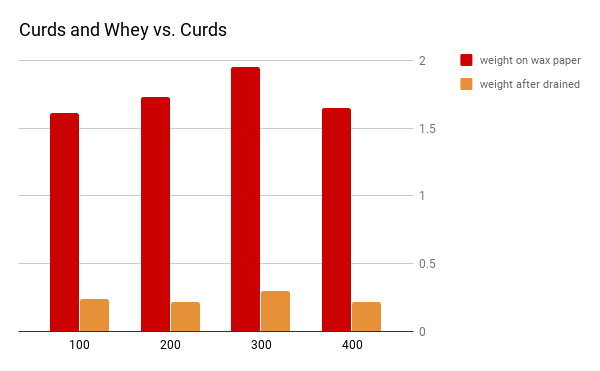
(Figure 10):
This is a visual representation of our data. It shows the original weight and how much of it was actually cheese curds and not whey.
This is a visual representation of our data. It shows the original weight and how much of it was actually cheese curds and not whey.
Part Three:
My hypothesis for this lab was that cheese would contain glucose, protein, and fat. This was true because we used milk with fat in it, most things contain sugars, and since it is a dairy product it would contain protein. An error in this lab was that we were not precise when measuring the cheese into the different solutions. A way we could have changed the lab was being more accurate with the measurements of cheese. This lab makes me want to investigate if this procedure would work on different foods.
My hypothesis for this lab was that cheese would contain glucose, protein, and fat. This was true because we used milk with fat in it, most things contain sugars, and since it is a dairy product it would contain protein. An error in this lab was that we were not precise when measuring the cheese into the different solutions. A way we could have changed the lab was being more accurate with the measurements of cheese. This lab makes me want to investigate if this procedure would work on different foods.
Conclusion
My overall discovery in these series of labs was that FPC is important if one wants to make cheese quickly and efficiently. In this three part lab we learned how cheese is made, which curdling agent works most efficiently, and what macro molecules are found in cheese. FPC is essential for making cheese commercially because it is the fastest way to curdle milk. This can be seen through our class data, it only took the FPC agent to curdle in 5.56 minutes while the runner-up took 1237 minutes to curdle which is a significant difference. FPC also had the lowest liquid waste (see figure 1) so that meant more cheese was being produced. We know that FPC is superior to the other agents because it has been genetically modified to curdle milk the fastest opposed to the others that are naturally found. With the given evidence we can conclude that FPC it the best curdling agent to make cheese quickly and efficiently.
Refection
A peak in this project was learning what different macro molecules are in my food and how my body process them and learning how cheese is curdled at different rates and how different amounts effect the time it takes to curdle. Another peak in this lab was the ability to make our own lab procedure because it gave me freedom on how I wanted my cheese to curdle faster.
A pit in this project was not being there on the first day because I missed the initial set of instructions so my group mates had to explain everything to me which slowed us down. Another pit in this project was I was not organized when writing my lab write-up so it took longer than it should have then if I had been organized.
A pit in this project was not being there on the first day because I missed the initial set of instructions so my group mates had to explain everything to me which slowed us down. Another pit in this project was I was not organized when writing my lab write-up so it took longer than it should have then if I had been organized.
