In this project we had to create a form of art through electronics to keep our robot overlords happy when they take over the world.
Key Terms and Concepts
Current - rate of flow of electric charge through a circuit
Voltage - potential difference in electrical charge
Circuit - a closed loop of electrical currents that transfers energy
Series - when the voltage must travel through multiple “obstacles”
Parallel - when voltage splits between two paths
Resistors - reduce current flow and at the same time lowers voltage levels within circuits
Breadboard - construction base for prototyping of electronics
Coding - programing instructions
We first had to complete a circuit packet where we learned about electrical currents. In this packet we experimented with parallel circuits, series of light bulbs, and switches. We learned with parallel circuits that the voltage is split between the two paths. With series each light bulb is the same and switches turn on and off the light bulbs.
We then moved onto a breadboard packet where we learned where to put stuff on a breadboard to make things do cool things, like a light blink. Throughout this packet we were mainly focused on how resistors affected the voltage and current. At the end of this packet we did a blinky light quiz where a resistor would affect the speed of which the light would blink.
Our final step before the final art show was an arduino program packet where we used a breadboard and the Arduino program to code a light blinking, writing on a LCD screen, notes that are played from a sound box, and the speed of a mini fan.
Our final product was the song 1812 Overture with lights that went off when certain lengthed notes played. Here is what our final project sounds and looks like. (Hopefully it keeps our robot overlords happy.)
This was the code for our final project:
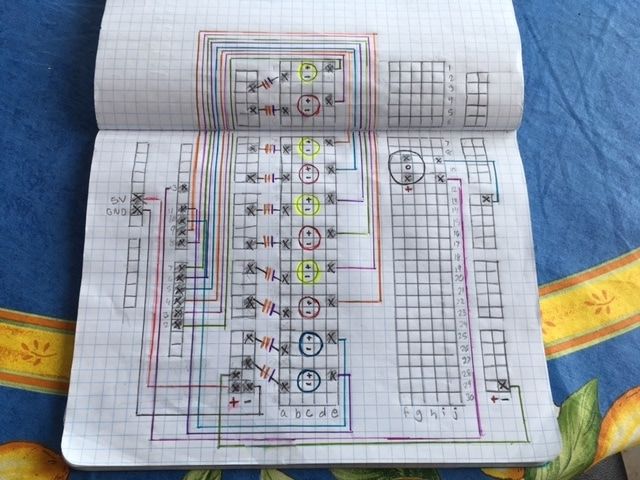
This is the circuit diagram for our final project
Reflection
In this project I learned how to use a breadboard and basics of coding. This going to be very beneficial to me in the future because it is something thing that is going to be relevant in my life.
In this project it was hard to both of us work on the same program with only one laptop because we kept getting in each other's way. It was also hard to start coding without any prior knowledge so we had to do extra research to fully understand what we were doing.
In this project it was hard to both of us work on the same program with only one laptop because we kept getting in each other's way. It was also hard to start coding without any prior knowledge so we had to do extra research to fully understand what we were doing.
